Showing posts with label kids crafts. Show all posts

Tuesday, September 28, 2010

Fun Fall Art Project

This morning after we took the kids to school, Parker, Connor and I were eating breakfast.  Parker asked me, "So what art project are we doing today mom?"  I had to think fast and remembered a fun fall leaf project that I've done before with some of my other kids.  I told Parker the game plan and he was so excited.  I told him that we'd have to wait until Connor took his nap though because I knew he'd be a little too helpful:)  All morning, Parker was asking me if it was Connor's nap time yet.  Finally the nap came and the art project started.  First we gathered some broken fall colored crayons and peeled off the wrappers.


It took a while to peel all of them, but Parker had fun doing it.  I loved watching the look of pure concentration on his face!  With the help of his favorite mommy, they finally all got peeled. 


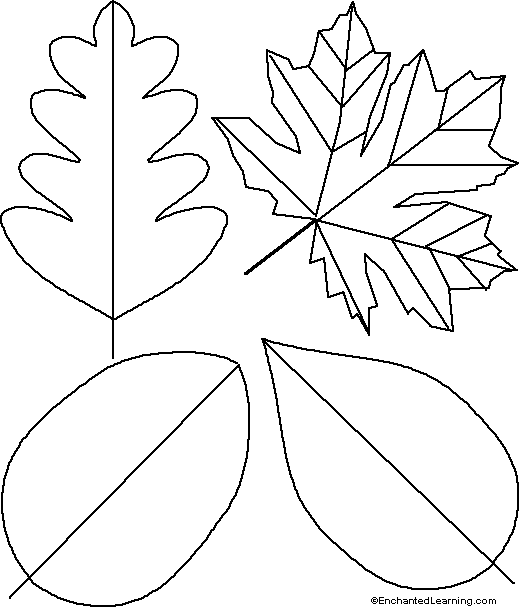
Next, we got some wax paper and drew leaf outlines on it.  I was going to free hand the leaves but apparently I way over estimated my leaf drawing abilities.  I kept ending up with Christmas trees.  I admitted defeat and turned to the internet for some help.  If your artistic abilities are as amazing as mine you can find some basic leaf outlines here.  I traced them onto the wax paper.  I decided to cut a couple of them out first but most of them I did not cut out.  As it turns out, it is much easier and turns out way better if you do not cut the leaf outlines first.  When you draw the leaves on the wax paper, you'll want to use a black permanent marker so that it will still show up when it's time to cut them out. 

Good idea:

Bad idea:

Parker was very excited about this next step.  Before you get into it though, you'll want to lay down some newspaper or something.  I couldn't find a single newspaper around the house so I used some freezer paper.  Things are going to get kind of messy, so be prepared:)  We got out some cheese graters and grated up our naked crayons onto the wax paper.  FYI, the finer grater seems to work better.  You really have to be careful with this part though because it's easy to grate little fingers.  I only gave Parker long crayons and I did the shorter ones myself.  We managed to get by without any casualties.  While you're making the crayon shavings, you'll want to plug in your iron.  You'll need it in a minute.


The crayon shavings will be all over.  Make sure there are plenty on the leaf outlines you drew.  When you're all done it looks so pretty!  Like a little fall party on your paper!

Next, put another piece of wax paper over the top of your crayon shavings.


Now it's time to use the iron to make some magic!  Iron directly on the top layer of the wax paper.  I just pressed it down on the wax paper long enough to melt the crayon.  It happens really fast.  Make sure they melt down, but the less time you leave it on the cooler it looks in the end. 


I loved watching Parker's face.  First the anticipation,


then the magic!


(Yes, I was taking pictures of him while I was ironing.  Be very impressed:)  When the crayons are melted you'll want to let it cool for minute.  As a side note, make sure you don't have any crayon on your iron before you turn it off.  Melted crayon on your husbands white shirt may not go over well.  I just rubbed it around on an old dish towel to rub any melted crayon off.  After it cools, you can cut out the leaves.  This is when you want to make sure you can really see the leaf outlines.


When they're all cut out you'll have yourself some neat looking fall leaves!


After trying to figure out what to do with them, we decided to hang them from a string in front of the window.  I love the way they look with the light shining through them.  It really makes the colors stand out.  Now I only wish we had made more of them.  Maybe another day:)

Tuesday, September 7, 2010

Nature Picture

Today for "Mommy Preschool" we went on a nature walk.  The original plan was to go on a nature walk around our neighborhood.  As it turned out, Connor was napping when we got to that part of our day.  So, we improvised and went on a nature walk around our yard gathering things to use for a picture.  It was so cute to watch Parker carefully examine the different leaves, weeds and flowers trying to find unique and interesting things to make his picture with.  This is the stash that we came in with:


We also found some pom-poms and googly eyes in our craft box that we pulled out for added fun.  Parker had so much fun arranging nature on his paper to create a picture.  He arranged everything and then I used the glue gun to glue it to the paper.  In his mind he created a whole character for the man he made.  This is the newest super hero - Nature Boy!  "If he sees any plants that are dying he can make them alive again and then they can't die any more.  He helps take care of animals too."  I really enjoyed watching him create his picture and talk with him about his creations.  He kept saying thing like, "This is so fun!",  "This is the best project ever!"  I've definitely got to do more things like this.  I sure do love one on one time with my kids!

His favorite part of the picture?  The googly eyed lady bug sitting on the leaf of the tree.
I just love his cute little four year old handwriting and had to take a picture of the "Parker 4" in the corner of his picture.

Monday, August 23, 2010

Love


I love school supply season.  You can't beat 25 cent crayolas.  You just can't.
P is for....

Even though summer is over, the kids haven't wanted to put an end to the "summer of fun" (ha, I flatter myself. Okay, I should say Kylie has still wanted to do crafts, Jayden would much rather play the wii or legos, surprise).  We've still been fitting in a few crafts between homework and friends and here are the latest:

Playdough- Koolaid Playdough: 1 C flour, 1/4 C salt, 2 Tbs cream of tarter, 1 Tbs veg. oil, 1 pkg koolaid mixed with 1 C water, glitter (optional- you can also add extra food coloring if you want)- cook all ingredients over med heat until ball forms, remove from heat and knead dough on floured surface until no longer sticky, store in airtight container- this is the best homemade playdough recipe I've found, it stays soft for a really long time.

Pretzels- once again, ode to the Rhoades dough! (dipped in powder sugar/milk frosting.mmmm.)
Puppet show- you can get kits at the store, but my kids (or should I say, Kylie and her friend) spent hours creating their own puppets, scenery and writing up the play (too bad it took so long that her friend had to go home before they could perform it and then Kylie was mad at me for all of eternity, or atleast until the next day when I bribed her with an otter pop to let me take her picture.)

Perry Pool- according to my kids the Basha pool is way more cooler and the life guards are way more nicer. Apparently they're little pool snobs, but they still had fun with their friends.

Puzzles- my kids love puzzles and I love that you can get them anywhere for cheap (I got this United States one at Wal-mart for $2, but the dollar store has plenty also).  I also love that the little chubby fingers could help too.
(the more he concentrated, the bigger the puddle of drool was under his chair)


Peter Pipers Pizza- enough said.

Picture scavanger hunt- The kids love this (even Jayden). I give them a camera and a list of things to take pictures of (like "something shiney", "something pokey", "something really old", "something stinky", etc.).  They had all their friends running around the house taking pictures then I would guess what they were.  It was fun to see what they came up with.

Paint- corn syrup paint, it's so cool! A little messy for the little monkey and it takes a while to dry, but it turns out really cool.  Just mix a couple of drops of food coloring in a couple of tablespoons of cornsyrup.  Draw the picture out first with a crayon (the site recommends glossy craft paper, but regular paper worked just fine)


Friday, August 6, 2010

D is for....

(these are pre-Cannon days, bear with me :)

Drive-in movies. It may have been a little toasty (I think we sweated off the popcorn and candy calories in the first 5 minutes), and a little late at night, but it was such a fun night with friends and a great way to say good-bye to summer.

Duck tape crafts. I had this on my list so I was excited when my mom took the bull by the horns at our reunion and headed up the duck tape craft extravaganza. We made the purses by wrapping the duck tape around ziploc freezer bags then decorating them. I wish I would have gotten a picture of all the different ones, we had some creative ladies who let loose with duck tape flowers, ruffles, stripes and weaving.


Donuts. Is there anything you can't make with Rhodes dough? Defrost, make a donut shape, fry in hot oil and dip immediately in cinnamon/sugar mixture (you can also dip in powdered sugar)

Daddy lunch. One last hurrah before the kids start school and are doomed to PB&J for the next 10 months.

Dinosaur pictures. They didn't turn out quite like this, but the kids always have fun anytime paint is involved.

Dodgeball. Waterballoons were the only way to go with this, but the rules of the game didn't last long before it turned into a full on water fight.

Dirt drawings. Just like the elementary school glitter projects, just pour dirt on the glue instead.